Introduction

Adobe Flash was created in 1996 as a way to display rich media on a webpage. In the mid-90s, most websites were a collection of static pages that displayed only text and images. When Flash was introduced, it opened a new world of animation and interactivity to the Web. People were able to create moving animations and clickable interactive graphics that went beyond the capabilities of standard HTML and CSS.
Flash was – and still is – owned by a single company, which is now Adobe. This means that Flash is proprietary software, and is not an open standard on the Web.
Journalists wishing to use Flash for adding interactivity to a website must weigh the pros and cons and decide the best tool to use for telling a story.
Here are some of the pros for using Flash on a website:
- Quickly create rich interactive graphics using a timeline-based software tool.
- Utilize a number of pre-built libraries and classes to build sophisticated projects that might otherwise take longer to build from scratch.
- A cross-browser compatible tool that works the same on Internet Explore, Firefox, Mozilla, Opera and Chrome.
- Good for construction of data-intense animated data visualizations that need to access an online database.
Tools
There are dozens of tools in Flash that one can use for many various purposes in creating art. We will go over a few essential tools to start with.

The first are the two arrow tools; the Selection Tool (black arrow) and the Sub-selection Tool(white arrow). The Selection Tool is used for selecting and moving elements on the stage. It can also be used to bend and modify vector shapes. The Sub-selection Tool (white arrow) is only used for selecting drawing paths in shapes. The Selection Tool is generally used much more often and is the default tool for most tasks. The Sub-selection Tool is only used in specific cases when drawing or modifying vector shapes.

The Free Transform tool is used to change the size of an object on the stage. When using the Free Transform tool, you must first click on an object on the stage to select it, and then use the eight black handle points that appear around the box to change the shape of your object. When selecting objects with the Free Transform Tool, a small white circle will appear, usually in the center of the object. This is called the reference point, and can be moved with the mouse. This reference point will determine how the tool rotates and scales the object. It is also possible to skew an object by moving the cursor just outside the bound of the box.

The Lasso Tool is used for selecting object on the stage. It is done by drawing a circle around the objects you wish to be selected. It can also be used for selecting portions of a shape.

The Text Tool is used to create text boxes for entering text. The tool can be used by simply clicking the stage once to create a default text box (which can be resized later) or by clicking and drawing a text box to a desired shape. Static text boxes can only be drawn to a specified width and always start out as one line of text. This means you won’t be able to give your text box a height. As you type, you can press return to create additional lines of text. Dynamic text boxes can be given a height.

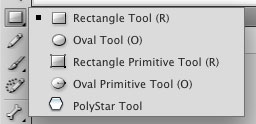
The Shape Tool is for drawing some basic preset shapes, like a rectangle, circle or polygon. Click and hold down on the tool item to select the shape type you want. There are settings in your property inspector for specifying characteristics of the rectangle and oval tools when you draw them. The primitive version of those shapes allow you to continuously edit those properties after you’ve drawn the shape (such as the rounded corners on the rectangle, and the shape of an oval). You will need to either break apart or convert the primitive shapes in order to further edit them.

The Color Picker Tools allow you to specify the colors of shapes either before you draw them, or you can change the color after you draw a shape if it’s currently selected. The colors can be selected by clicking on the the colored boxes just below the icon of a pencil and the icon of a paint bucket. The pencil icon represents the color for the stroke, and the paint bucket represents the color for the fill. The stroke and fill are discussed in greater detail in a future section.

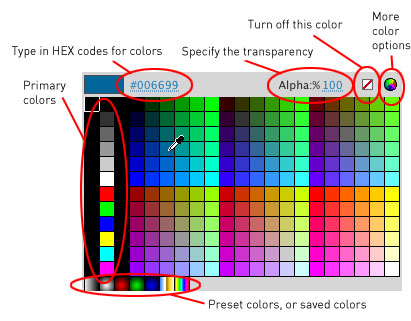
The Color Picker pallete has several options for choosing a color. Of notable interest are the options along the top of the window which allow you to turn off the color, or specify an Alpha (transparency) setting. If you have the six-digit color hexadecimal color code, you can type it in by clicking the code at the top of this box.
No comments:
Post a Comment